

How to Clean a Golf Simulator Impact Screen Safely
Material-specific care that removes stains without damaging tension, coating, or seams
Impact screen stains and ball marks affect both image clarity and fabric lifespan, but cleaning an impact screen is not the same as washing ordinary fabric. The combination of tensioned mounting, projection surface coatings, and engineered seams means that bleach, heat, abrasive scrubbing, or washing machines can turn a cleanable problem into permanent damage.
The goal is not to make the screen look brand-new every time. A good cleaning routine removes loose debris, surface stains, and accumulated dust while preserving fabric tension, protective coatings, and structural integrity so the screen continues to absorb impact and display a clear image.
Read the manufacturer's care instructions before using water or detergent. Impact screen materials vary—vinyl, polyester blends, woven synthetics—and each has different tolerance for moisture, chemicals, and mechanical cleaning.
1. Start With Dry Cleaning for Loose Debris
Most simulator screens accumulate turf rubber, dust, and chalk-like ball residue that can be removed without water. Dry cleaning avoids introducing moisture that may require long drying times or affect mounting tension.
- Use a soft-bristle brush (such as a horsehair or synthetic detail brush) to gently sweep the screen surface in downward strokes, working from top to bottom.
- For corners and seams, use a low-suction handheld vacuum with a soft brush attachment, keeping the nozzle from pulling or stretching the fabric.
- Avoid hard-bristle brushes, stiff brooms, or high-suction shop vacuums that can catch fabric threads or distort the weave.
- Perform dry cleaning weekly or after heavy use sessions to prevent debris from embedding into the fabric texture.
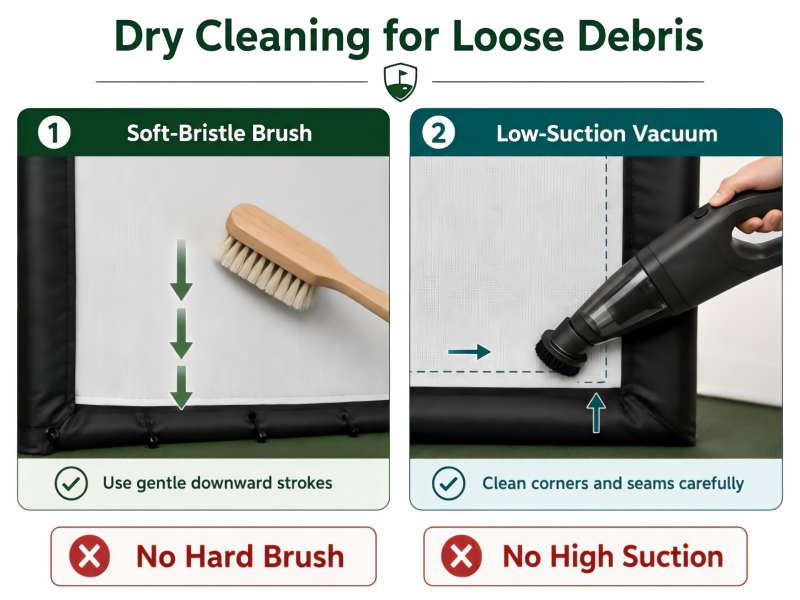
Use soft-bristle brushes with downward strokes and low-suction vacuums for seams—avoid hard brushes and high-power suction
Do not use compressed air or leaf blowers. High-pressure air can force debris deeper into the fabric weave or dislodge mounting hardware, and the force may create stress points in tensioned areas.
2. Test a Hidden Area Before Damp Cleaning
When dry cleaning does not remove stains, test any damp cleaning method on an inconspicuous area first—typically a lower corner or behind a mounting bracket—to confirm the fabric tolerates moisture and the cleaning agent does not discolor or degrade the material.
Safe Damp Cleaning Process
- Lightly dampen a white microfiber cloth with clean water (distilled water avoids mineral deposits).
- Blot—do not rub—the test area and wait 15-30 minutes to observe any color change, texture change, or fabric puckering.
- If the test area remains normal, proceed to the stained area using the same blotting motion, working from the outside of the stain toward the center.
- Allow the screen to dry fully at room temperature before testing or playing. Do not use hair dryers, heat guns, or direct sunlight to accelerate drying.
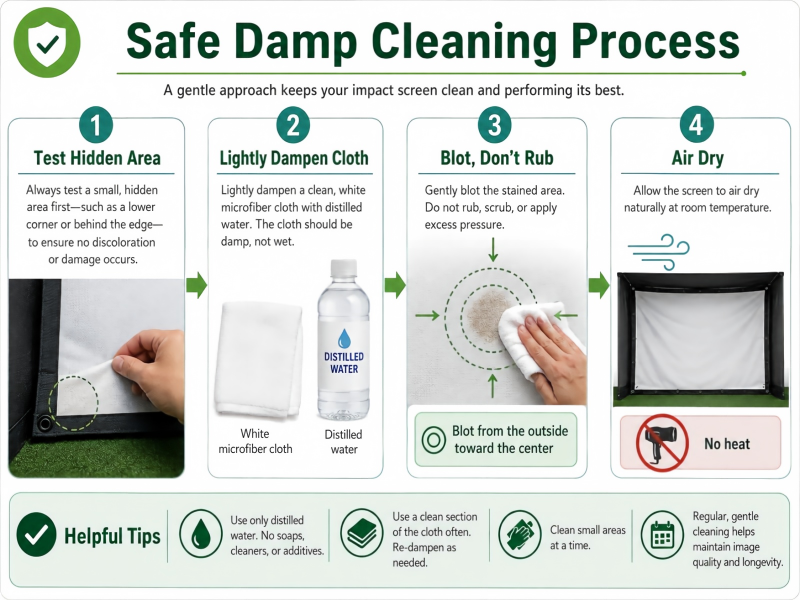
The correct damp cleaning sequence: test hidden area, use distilled water, blot from stain edges inward, air dry completely
For stubborn organic stains (such as hand oils or food), add a small amount of mild, fragrance-free dish soap to the water, but rinse the area with a clean damp cloth afterward to remove soap residue.
3. Avoid These Common Cleaning Mistakes
Many cleaning methods that work for household fabrics actively damage impact screens because they ignore the screen's tensioned mounting, projection coatings, or synthetic fiber construction.
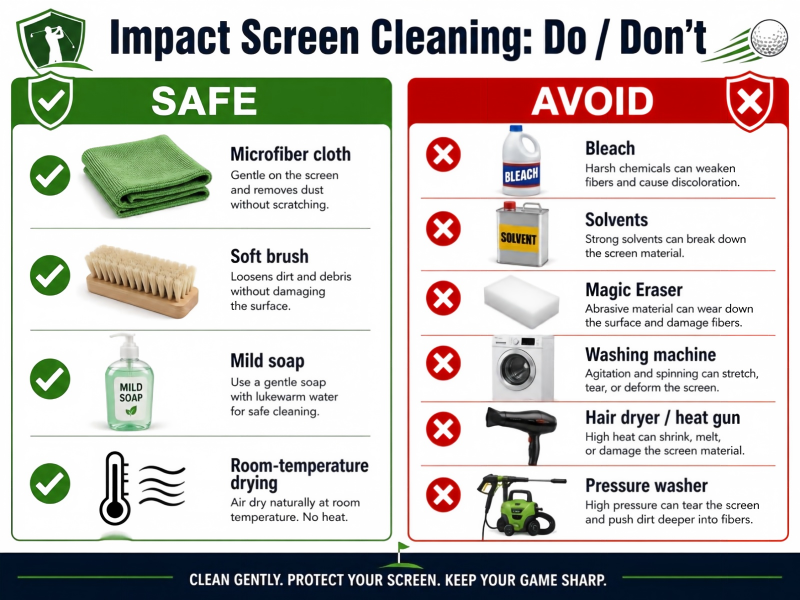
Safe cleaning uses soft materials and gentle methods—avoid bleach, solvents, abrasives, heat, and high-pressure water
- Bleach or chlorine-based cleaners: These degrade synthetic fibers, discolor projection coatings, and weaken seams.
- Solvent-based stain removers: Acetone, alcohol, or petroleum-based products can dissolve fabric coatings or adhesives.
- Abrasive pads or brushes: Scouring pads, stiff brushes, or melamine foam (Magic Eraser) scratch projection surfaces and fray fabric.
- Washing machines or dryers: Agitation and heat destroy fabric tension calibration and can melt or shrink synthetic materials.
- High-pressure washers or steam cleaners: Excessive water pressure distorts fabric weave and may drive moisture into the mounting frame, causing mold or hardware corrosion.
Think "preserve the surface, not strip it clean."
An impact screen is an engineered product, not a washable bedsheet. Aggressive cleaning trades short-term appearance for long-term damage.
4. Inspect Mounting and Tension After Cleaning
Moisture can temporarily relax fabric tension or reveal mounting issues that were masked by accumulated dirt. After the screen dries completely, check for:
- New wrinkles or sags that were not present before cleaning—this may indicate over-wetting or tension loss.
- Loose grommets or attachment points where cleaning motion stressed the mounting hardware.
- Discoloration patterns that suggest uneven absorption or trapped moisture in multi-layer screens.
If the screen shows creasing or tension changes, allow additional drying time. If problems persist after 48 hours, the screen may need re-tensioning or professional inspection rather than additional cleaning.
5. When to Seek Professional Cleaning or Replacement
Some stains and damage require professional assessment rather than DIY cleaning attempts.
- Deep impact dents or permanent creases that do not flatten after tension adjustment.
- Frayed seams or torn fabric around grommets or high-impact zones.
- Mold or mildew growth indicating moisture penetration into the screen core or mounting frame.
- Widespread discoloration that persists after gentle cleaning attempts.
A qualified installer or screen manufacturer can evaluate whether the screen can be safely deep-cleaned, re-stretched, or requires replacement to maintain safe impact absorption and image quality.
Keep Your Impact Screen in Peak Condition
Regular gentle cleaning extends screen life. For stubborn stains, structural issues, or material-specific questions, consult the manufacturer's support or a professional installer.
Share your screen material type, stain description, and mounting style to discuss safe cleaning options and replacement timelines.