

One-Bay vs Two-Bay Garage Golf Simulator: Which Setup Actually Works Better?
One bay saves parking space. Two bays promise more swing room. But which garage golf simulator layout actually works better in daily use? The answer depends on swing clearance, centered hitting, protection, parking, and setup time — not simply screen width.
A garage is one of the most practical places to build a home golf simulator. It provides a large open floor area, keeps golf equipment separate from the main living space, and can often accommodate a full enclosure, hitting mat, launch monitor, and projector.
But a common design question appears almost immediately:
Should the golf simulator fit completely inside one garage bay, or should it span across two?
A one-bay setup preserves more parking space and can be easier to live with day to day. A two-bay setup usually provides more freedom for centered hitting, wider swings, and different golfers — but it can also require moving vehicles, retracting equipment, and resetting the space before every practice session.
The better layout is not automatically the bigger one. It is the layout that gives every intended golfer enough room to swing safely while remaining practical enough to use on an ordinary day.
Start with the required swing and safety envelope — not the screen width.
A large screen does not help if the golfer, club, ceiling, garage-door hardware, or surrounding structure interferes with a full swing.
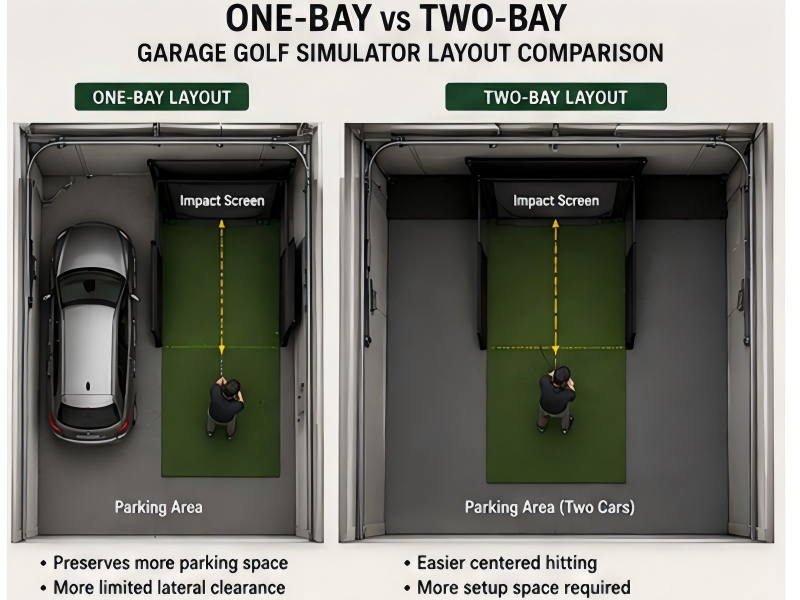
Measure the Complete Swing Envelope First
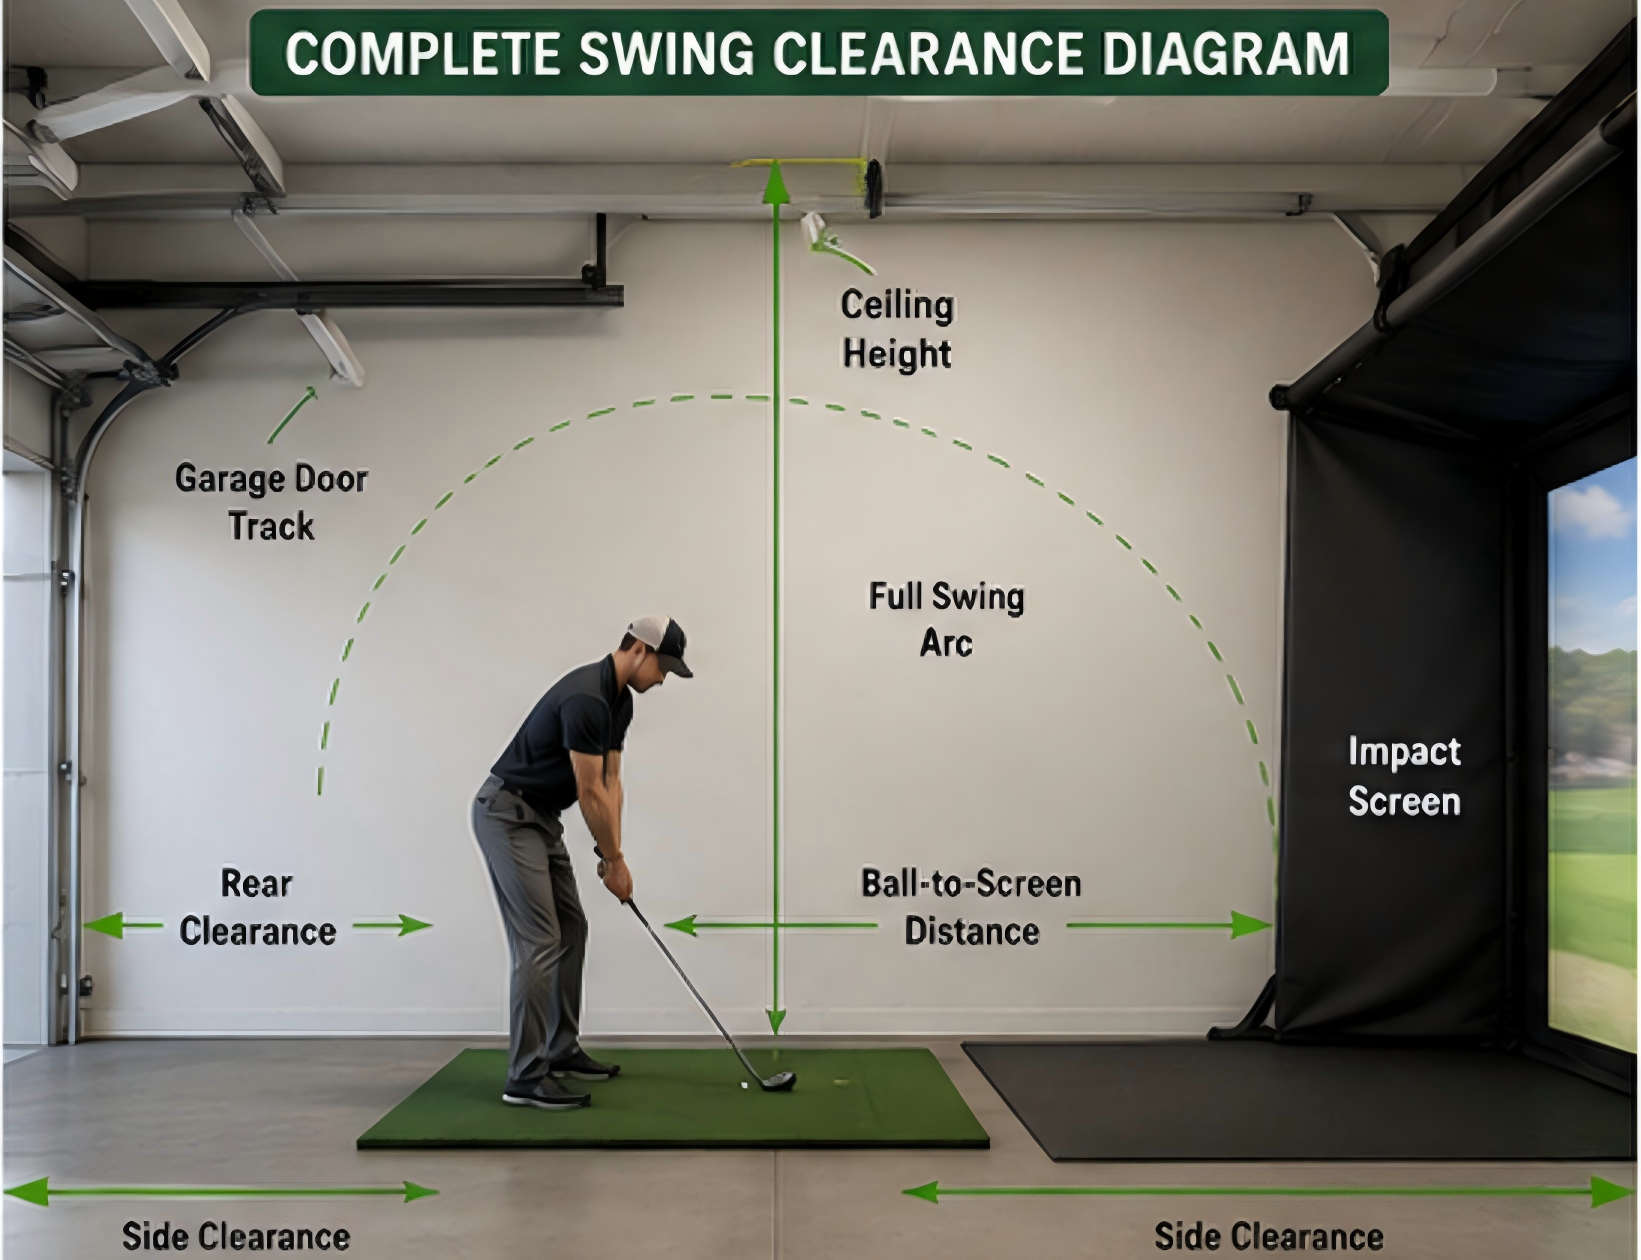
Before deciding between one bay and two, identify the complete space a golfer actually occupies during a shot.
Do not measure only from wall to wall. A usable simulator layout must consider the golfer, club, ball position, screen, enclosure, equipment, and existing garage structures as one complete system.
Check the following areas before fixing the simulator position:
- Full backswing clearance — Make sure the longest club can move freely behind and around the golfer.
- Follow-through clearance — Allow enough room for the club and golfer to complete the swing naturally.
- Ceiling height — Check the actual swing path, not just the golfer's standing height.
- Garage-door tracks and openers — Overhead hardware may occupy part of the swing area even when the ceiling itself appears high enough.
- Support beams and columns — Structural elements can reduce the usable width of an otherwise large garage.
- Ball-to-screen distance — The impact screen needs appropriate spacing from both the ball and objects behind it.
- Space behind the golfer — Enough room is required for the backswing and movement around the hitting area.
- Side protection — Consider where mishits could travel, not only where good shots are expected to go.
- Launch monitor position — Different equipment may need clear space beside, behind, or above the hitting area.
- Vehicle paths — Make sure cars, doors, storage shelves, and walking routes do not conflict with the simulator.
Most importantly, measure for every person who is expected to use the simulator. A layout that works comfortably for one golfer may feel very different for someone taller, someone with a flatter swing, or someone who plays from the opposite side of the ball.
When Does a One-Bay Golf Simulator Work?
A one-bay garage golf simulator can be an excellent solution when the complete hitting system fits comfortably within a single parking bay.
The main advantage is obvious: the simulator occupies less of the garage. Depending on the garage layout, the second bay may remain available for a vehicle, storage, workshop space, or normal household use.
A one-bay design is most practical when:
- The golfer can make a full swing without approaching walls, tracks, beams, or stored equipment.
- The hitting position can remain reasonably centered relative to the protected impact area.
- The impact screen and side protection provide adequate coverage for realistic misses.
- The launch monitor can operate from its required position without blocking movement.
- The garage can still function normally when the simulator is not being used.
The important phrase is comfortably within one bay.
If fitting everything into one bay forces the golfer against a wall, pushes the hitting position excessively to one side, or reduces protection around the impact area, the smaller footprint may not be worth the compromise.
Centered Hitting vs Offset Hitting: Does It Really Matter?
One of the biggest differences between a one-bay and two-bay layout is where the golfer can stand relative to the screen.
Ideally, many golfers prefer a hitting position that feels naturally aligned with the usable screen area. In a narrow garage bay, however, the golfer may need to shift the ball position to one side to create enough backswing clearance.
This is known as an offset hitting position.
Offset hitting is not automatically a problem. In some garages, a moderate offset creates an efficient layout while maintaining comfortable swing clearance.
The problem begins when the offset is used simply to force a simulator into a space that is too narrow.
Do not sacrifice swing clearance just to make the hitting position look centered. Likewise, do not force an extreme offset simply to keep the simulator inside one bay.
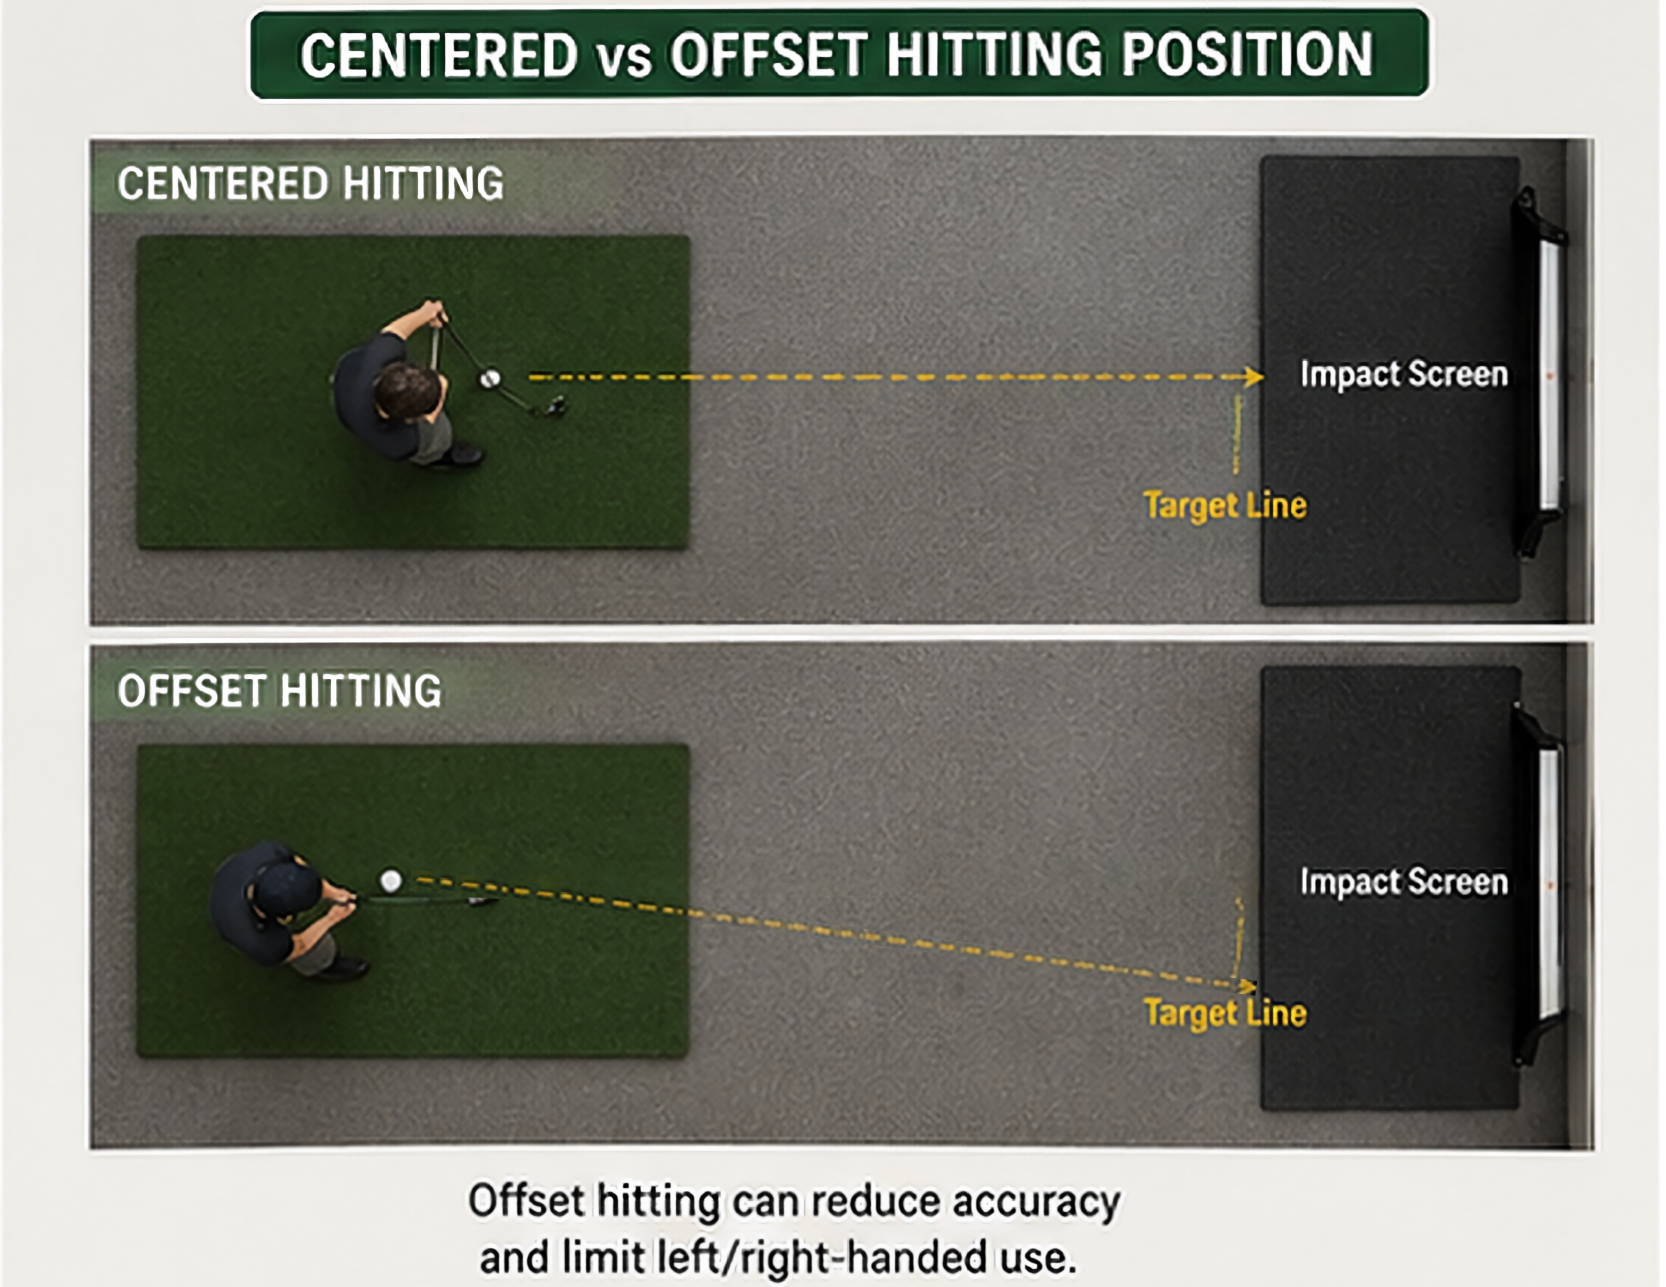
Before choosing either position, test whether the golfer can address the ball naturally and swing every intended club without feeling the need to shorten, steer, or protect the swing from nearby objects.
What If Both Left-Handed and Right-Handed Golfers Will Play?
Handedness can completely change the space requirement.
A layout designed around a right-handed golfer may place the hitting position close to one side of the garage while leaving backswing room on the other. When a left-handed golfer uses the same position, that clearance requirement reverses.
This is why a simulator that feels spacious for one golfer may become restrictive for another.
If both left- and right-handed golfers will use the simulator regularly, test the swing envelope from both sides before choosing the final layout.
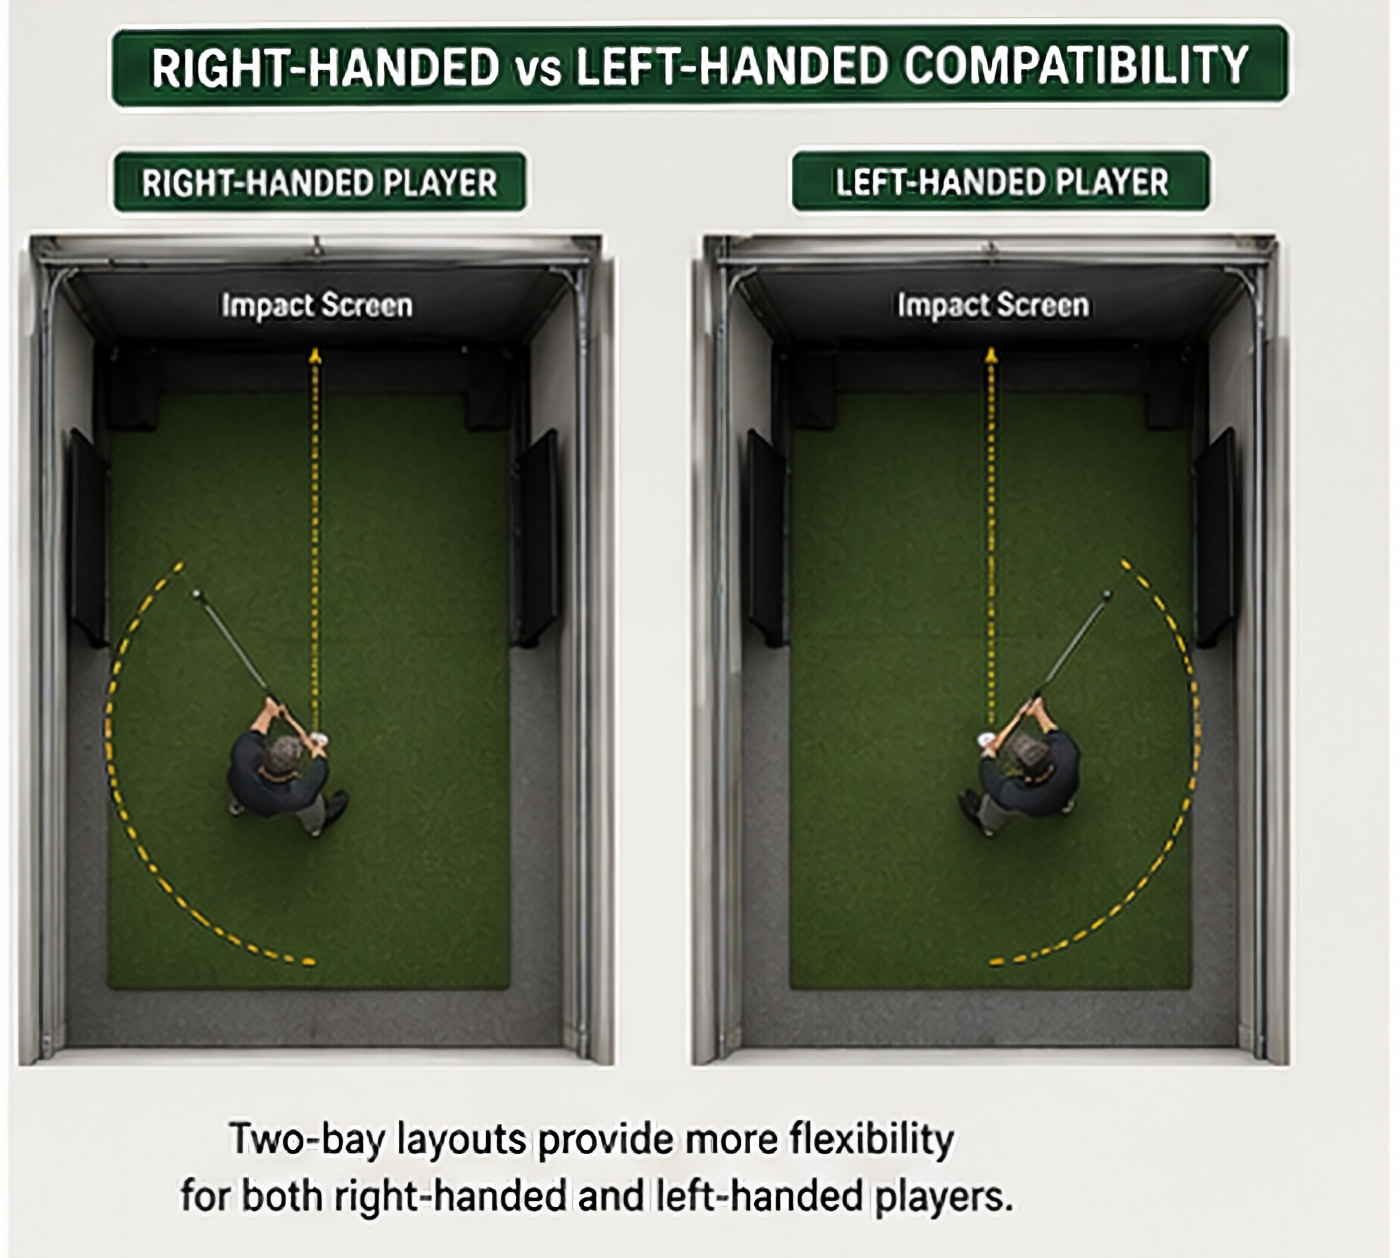
A wider layout spanning two garage bays can make it easier to accommodate both orientations because the hitting area has more freedom to remain near the center of the available space.
However, if a single bay already provides comfortable clearance for both users, expanding into the second bay may add complexity without solving a real problem.
When Spanning Two Garage Bays Makes Sense
Using two bays gives the simulator access to a much wider portion of the garage.
This additional width can make several design problems easier to solve.
- More centered hitting — The golfer has greater freedom to stand closer to the center of the protected hitting area.
- More lateral swing clearance — Walls and stored items are less likely to enter the swing envelope.
- Better left/right flexibility — Opposite-handed golfers can often use the same hitting zone more comfortably.
- Wider side protection — A larger enclosure or curtain system can cover a broader potential miss area.
- More layout flexibility — Mats, launch monitors, seating, and other simulator components can be positioned with fewer compromises.
But the extra space comes with an operational cost.
If two cars normally occupy the garage, a two-bay simulator may require moving both vehicles before every session. Flooring may need to be rolled, folded, or separated. Curtains or enclosure sections may need to retract. Mats and other equipment may need dedicated storage positions.
A layout can therefore look excellent when fully assembled but still become frustrating if it takes too much effort to use regularly.
Parking Changes the Design
For many homeowners, the garage must remain both a golf room and a parking space.
In that situation, the real question is not simply, “How large can the simulator be?”
A better question is:
How quickly can the garage change from parking mode to golf mode — and back again?
This is where retractable or removable components can become especially useful.
- Retractable simulator enclosures or curtains can open the garage for vehicles when golf is finished.
- Roll-up or removable side protection can reduce the permanent footprint around the hitting area.
- Movable hitting mats can clear vehicle tire paths.
- Retractable or sectional flooring can preserve the normal garage floor when required.
- Dedicated wall storage can keep loose simulator equipment away from cars and walking routes.
The best retractable system is one that fits your real routine. If several heavy components must be moved individually every time, the theoretical parking convenience may disappear in practice.
One-Bay vs Two-Bay Garage Simulator: Side-by-Side Comparison
Mock Up Both Layouts Before Installing Anything Permanently
A garage can look very different on a drawing than it feels with a driver in your hands.
Before fixing an enclosure, screen, flooring, projector, or other equipment in place, create a temporary floor plan.
- Use painter's tape to mark the planned screen and enclosure width.
- Mark the intended ball position.
- Mark the golfer's stance area and launch-monitor position.
- Check the garage-door tracks, opener, lights, beams, shelves, and stored equipment above and around the swing area.
- Make controlled, slow practice swings with the clubs you expect to use.
- Repeat the test for every regular golfer, including both left- and right-handed users where applicable.
- Move vehicles into their normal parking positions and check the available storage and walking paths.
- Repeat the same process with the proposed two-bay layout before deciding.
This simple test often reveals problems that are difficult to notice from dimensions alone.
Do Not Design Only for the Perfect Golf Shot
Your simulator also needs to account for imperfect shots.
Side protection should cover realistic misses, and overhead protection may be important where lights, door mechanisms, ceiling surfaces, or other equipment are exposed.
The golfer should also have enough space to enter and leave the hitting position without stepping over equipment or squeezing between the enclosure and another object.
A layout that barely works when everything is perfectly positioned may become inconvenient once balls, clubs, launch-monitor accessories, cables, and normal garage storage are added.
So, Is One Bay or Two Bays Better?
If a one-bay simulator provides complete swing clearance, suitable protection, a comfortable hitting position, and room for the required equipment, keeping the installation compact can be a very practical choice.
If the one-bay plan requires an uncomfortable offset, limits left- and right-handed use, or places the swing too close to surrounding structures, spanning two bays can create a much more flexible simulator environment.
But extra size alone does not make a better simulator.
The final decision should include the everyday routine:
- How many cars need to return to the garage?
- What equipment must move before playing?
- How long does setup take?
- Where will the mat, curtains, enclosure sections, and accessories be stored?
- Can one person realistically change the garage from parking mode to golf mode?
- Will the simulator still be convenient enough to use several times a week?
Choose for an ordinary day, not for the largest possible installation.
The right garage simulator layout balances swing clearance, protection, parking, and the time required to actually use the space.
Planning a Garage Golf Simulator?
For garages that must continue serving as parking spaces, a retractable golf simulator enclosure can help combine a protected hitting area with a more flexible everyday layout.
Before selecting the enclosure size, collect the garage width, depth, ceiling height, door-track position, hitting position, golfer handedness, launch-monitor requirements, and normal vehicle arrangement.
These details make it much easier to determine whether one bay is sufficient or whether a wider two-bay configuration will create a more usable simulator.
Building a simulator without giving up your garage?
Share your garage dimensions, door-track location, golfer positions, parking requirements, and preferred screen area to discuss a retractable enclosure layout for your space.
Start with the space you need to swing safely — then design the simulator around how you actually use the garage.