

How to Choose a Budget Projector for a Home Golf Simulator
A comprehensive guide to measuring your space, matching specifications, controlling ambient light, and testing before permanent installation
Choosing a projector for your home golf simulator is not about finding the most expensive model with the highest specifications. It's about finding the right projector for your specific space, lighting conditions, and practice habits. Many golfers make costly mistakes by comparing projector models before understanding their room's requirements, leading to purchases that either won't fit properly or deliver poor images despite impressive specs.
A successful simulator projector installation depends on throw distance, screen dimensions, aspect ratio compatibility, ambient light control, mounting position, input latency, and thorough testing before permanent installation.
Measure first, shop second. Your room's physical constraints will immediately eliminate some projector options and highlight others worth investigating.
1. Document Every Critical Room Measurement
Before opening a single product page, you need precise measurements of your space. These numbers determine which projectors are physically compatible with your room.
- Throw distance: Measure from your intended mounting position to the screen surface. Most budget projectors require 10-15 feet for standard simulator screens.
- Screen dimensions: Record exact width and height. Standard simulator screens range from 9-12 feet wide and 7-9 feet tall.
- Ceiling height: Measure floor to ceiling at the mounting location. You need at least 9 feet of clearance in the hitting zone.
- Electrical outlets: Note outlet locations and measure cable distances from outlet to mount and computer to projector.
- Windows and doors: Document when direct sunlight enters the room and from which direction.
- Obstructions: Identify ceiling fans, light fixtures, or structural elements that could interfere with the light path.
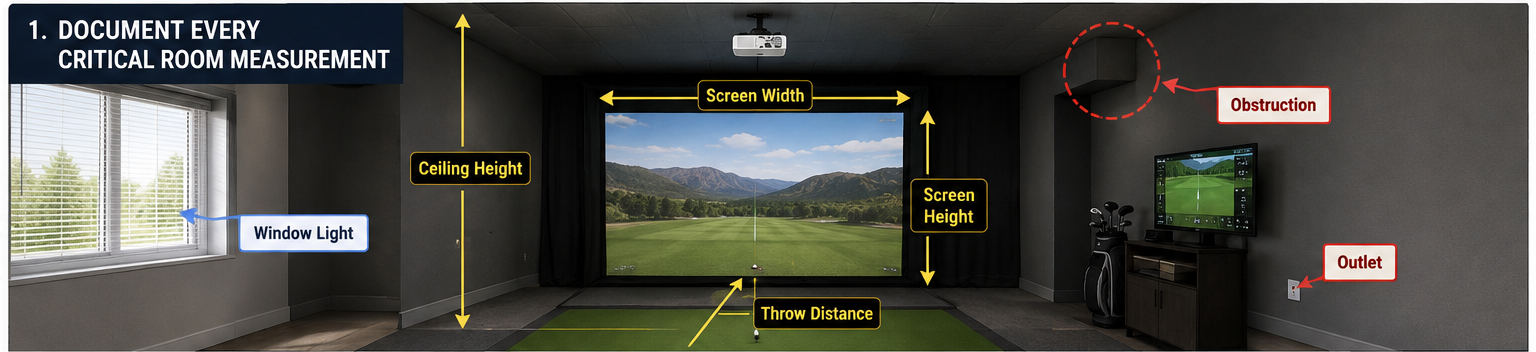
Seven critical measurements determine projector compatibility: throw distance, screen dimensions, ceiling height, outlet location, window position, and obstruction clearance
Do not estimate measurements. A difference of just 12 inches in throw distance can mean the difference between a properly sized image and one that doesn't fill your screen.
2. Match Aspect Ratio and Resolution to Your Screen
Projectors output specific aspect ratios, and your screen must match this ratio to avoid distorted images or wasted space.
- 16:9 aspect ratio: The modern standard compatible with most golf simulator software. A 12-foot-wide by 6.75-foot-tall screen is 16:9.
- 4:3 aspect ratio: Less common but found on older screens. A 12-foot-wide by 9-foot-tall screen is 4:3.
- 1080p resolution: The minimum recommended resolution for clear graphics. This is the sweet spot for budget projectors.
- 720p resolution: Found on very inexpensive units but produces noticeably softer images on larger screens.
3. Calculate Brightness Requirements for Your Ambient Light
Brightness, measured in lumens, determines how well the projected image competes with ambient light. The right brightness level depends on how much light your room allows during typical practice times.
- Controlled lighting (2,000-2,500 lumens): Basement or room with blackout shades. Budget projectors excel here with vibrant, high-contrast images.
- Moderate ambient light (2,500-3,000 lumens): Room with curtained window or closed garage door during daytime practice.
- High ambient light (3,000+ lumens): Windows with direct sunlight or open garage door. May exceed budget capabilities unless you add shades.
- Test brightness in actual conditions you'll use the simulator, not idealized nighttime darkness.
Control your environment before upgrading equipment. Blackout shades and curtains can make a $400 projector perform like a $1,000 unit.
4. Understand Throw Distance and Lens Requirements
Throw distance is the space between the projector lens and screen. Every projector has a throw ratio describing how far away it needs to be to produce a specific image size.
- Standard throw (1.5:1 to 2.0:1): To project a 10-foot image, the projector needs 15-20 feet from the screen. Most affordable option.
- Short-throw (0.5:1 to 1.0:1): Projects 10-foot image from just 5-10 feet away. Ideal for compact spaces but more expensive.
- Lens shift: Mechanical adjustment without moving the projector. Better quality but less common on budget units.
- For golf simulators, mount the projector behind the golfer, above head height, so you stay out of the light path during swings.
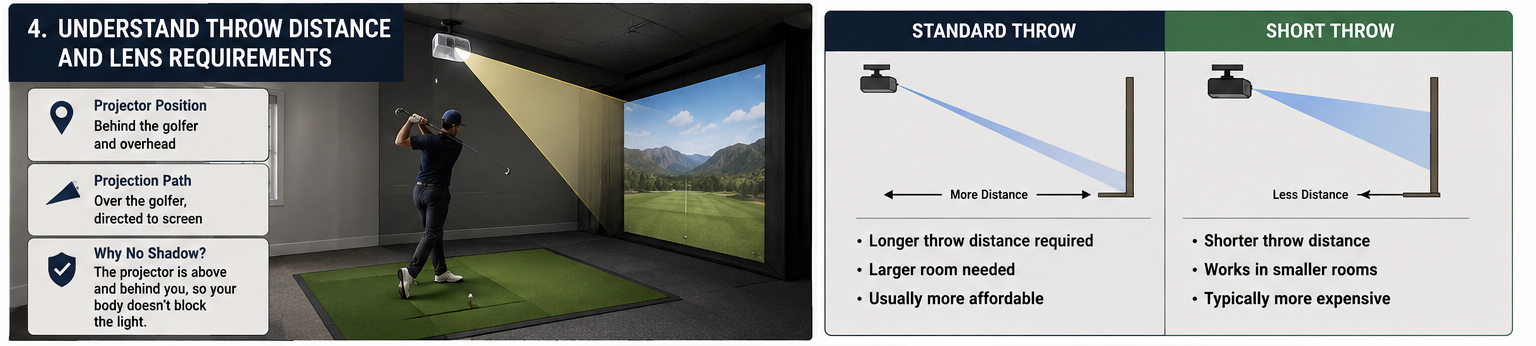
Correct projector placement behind the golfer prevents shadows during swings, with standard throw requiring 15-20 feet and short throw needing only 5-10 feet
Do not guess throw distance compatibility. An incompatible throw ratio means the image will never properly fill your screen, regardless of adjustments or settings.
5. Evaluate Input Latency, Fan Noise, and Heat Output
These three factors are frequently overlooked but significantly impact your simulator experience.
- Input latency: Delay between signal and image. High latency (over 50ms) makes simulators feel sluggish. Look for gaming projectors.
- Fan noise: Budget projectors often use louder fans. Check noise specifications or reviews before purchasing.
- Ventilation: Ensure mounting location allows air flow. Avoid enclosed spaces with no clearance.
- Cable length: HDMI cables over 25 feet may degrade. Consider active HDMI cables for long runs.
6. Test Thoroughly Before Permanent Installation
The only way to confirm a projector works in your space is to test it from the actual hitting position. Take advantage of return periods before drilling mounting holes.
- Temporary test mount: Use a tripod or sturdy box to position the projector at intended height and distance.
- Shadow check: Swing a club from your mat and watch for shadows on the screen.
- Image alignment: Confirm the projected image fills the screen without spilling over edges.
- Brightness testing: Check image quality at different times if ambient light varies in your space.
- Heat monitoring: Run the projector for 30 minutes and check for excessive heat buildup.
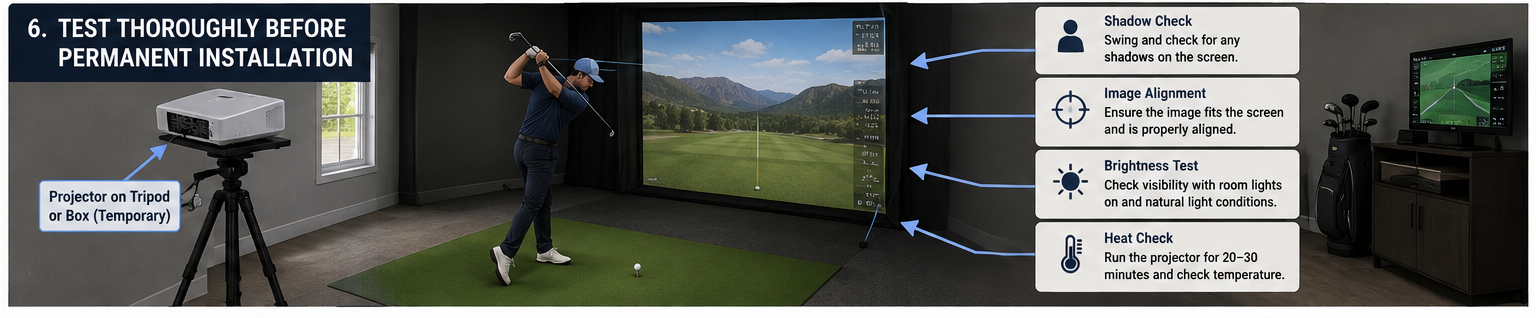
Pre-installation testing with temporary mounting reveals shadow issues, alignment problems, brightness inadequacies, and heat concerns before permanent installation
Verify the return policy before purchasing. Look for retailers offering at least 30 days to test in your actual space.
7. Final Checklist Before Purchase
Run through this final checklist to confirm you've covered all critical factors:
- Measured throw distance, screen size, ceiling height, and mounting position
- Confirmed projector aspect ratio matches your screen
- Selected appropriate resolution (1080p recommended)
- Estimated lumens needed based on room's ambient light
- Verified throw ratio works with your measured distance
- Checked input latency reports or reviews
- Planned cable runs and purchased appropriate cables
- Verified return policy and window (30 days recommended)
Measure, Match, Test, Install
A budget projector can deliver an excellent golf simulator experience when you start with accurate measurements, match specifications to your space, control ambient light, and test thoroughly before permanent installation.
Before purchasing, document all room measurements, verify aspect ratio compatibility, calculate brightness needs, and confirm the return policy allows adequate testing time in your actual space.