

Golf Simulator Enclosure Assembly Guide
This golf simulator enclosure is designed with a simple assembly structure, making it easy to build a complete indoor golf hitting bay for home practice, golf simulator rooms, training studios, and commercial golf facilities.
The installation process includes frame assembly, enclosure fabric installation, screen connection, bungee cord hanging, and final cover strip finishing. With clear parts and step-by-step installation, the golf simulator enclosure can be assembled efficiently.
A golf simulator enclosure is an important part of an indoor golf practice system. It combines a metal frame, rear enclosure fabric, side protection fabric, front impact screen, rear sound-dampening screen, elastic bungee cords, and frame cover strips to create a complete golf simulator bay.
This product is suitable for indoor golf simulator rooms, home golf practice areas, garage golf setups, golf teaching studios, golf academies, sports clubs, commercial simulator bays, and other golf training spaces. It can be used together with golf hitting mats, golf practice mats, launch monitors, projectors, golf nets, and other golf simulator accessories.
Golf Simulator Frame Preview
Before installation, the complete golf simulator frame structure can be viewed first. The frame provides the basic support for the whole golf simulator enclosure, including the top frame, side frame, rear structure, fabric panels, impact screen, and finishing parts.
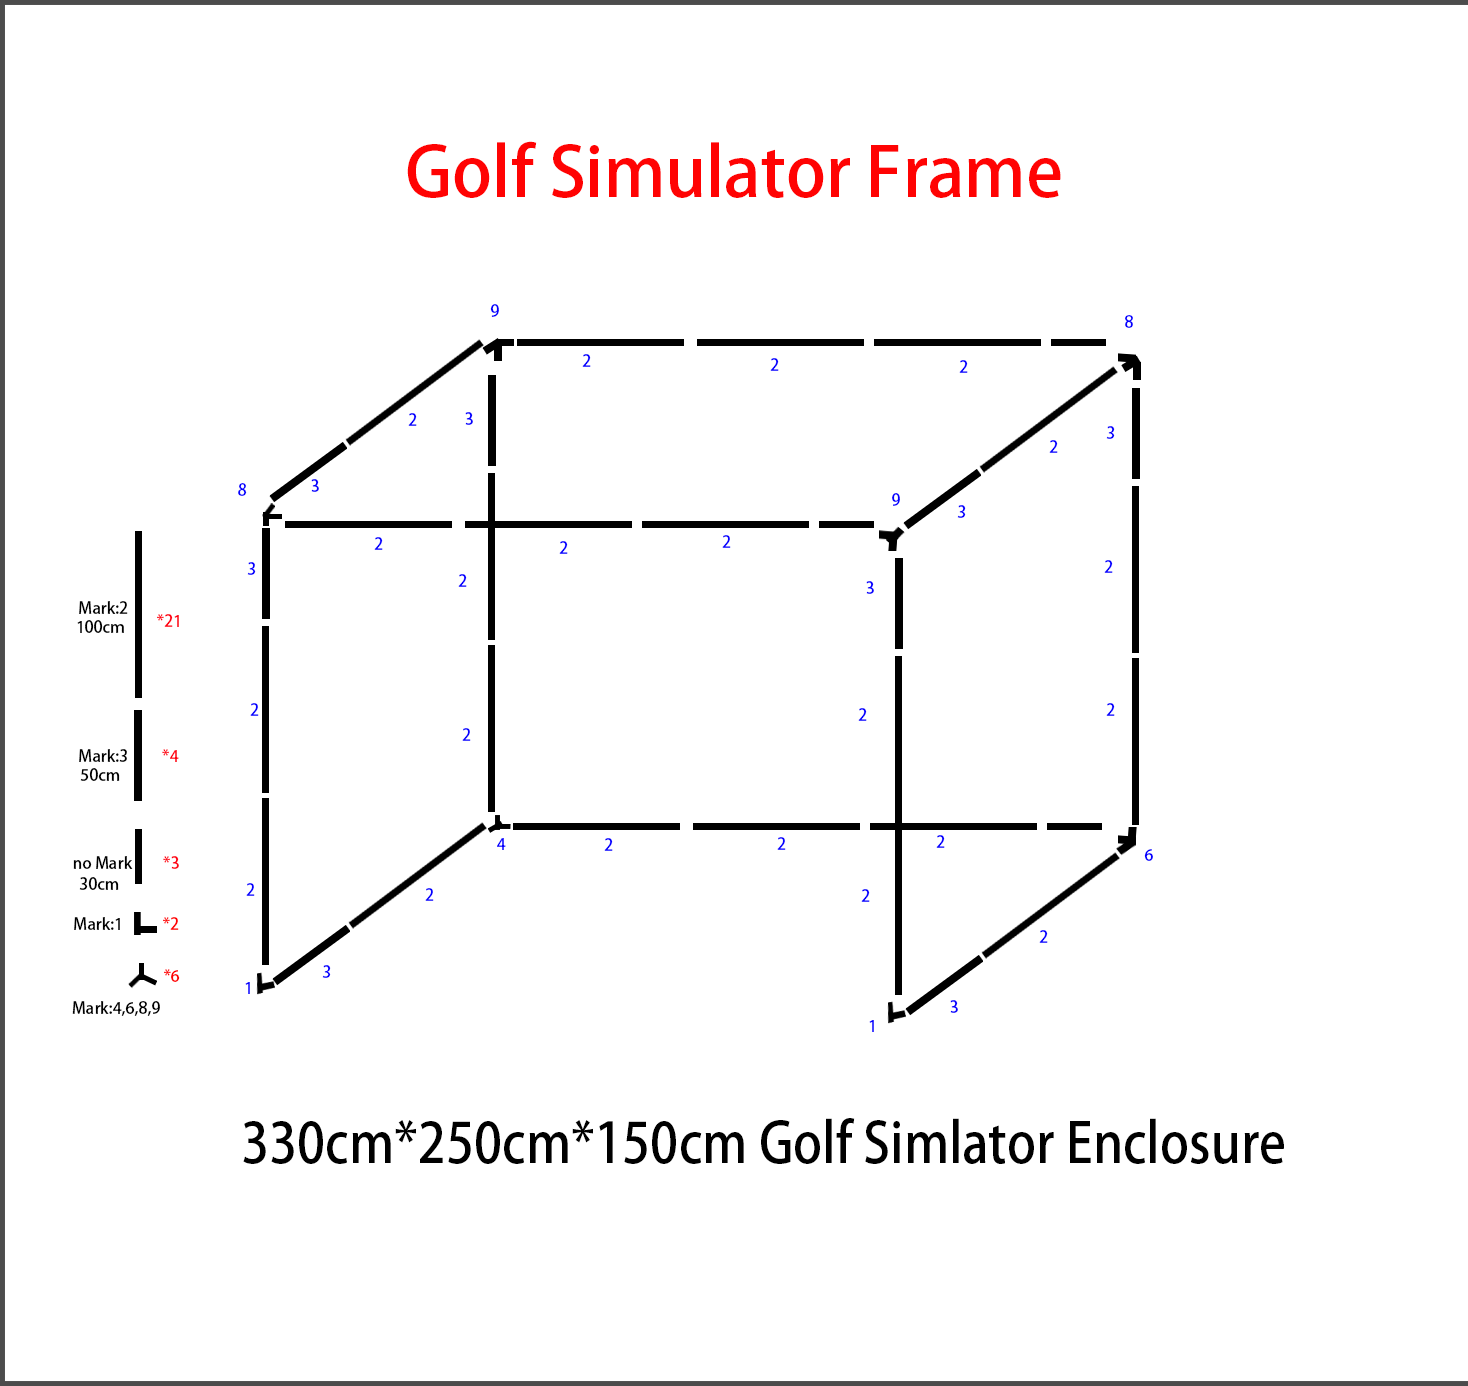
Golf Simulator Frame Preview
A stable frame is very important for the golf simulator enclosure. It supports the enclosure fabric and impact screen, and helps create a safe and professional hitting area for daily golf training.
Step 1: Assemble Part Of The Frame And Install The Enclosure Fabric
The first installation step is to assemble part of the metal frame. After the first section of the frame is connected, the enclosure fabric can be installed onto the frame. This method makes the assembly process easier because the fabric can be positioned before the whole structure is fully closed.
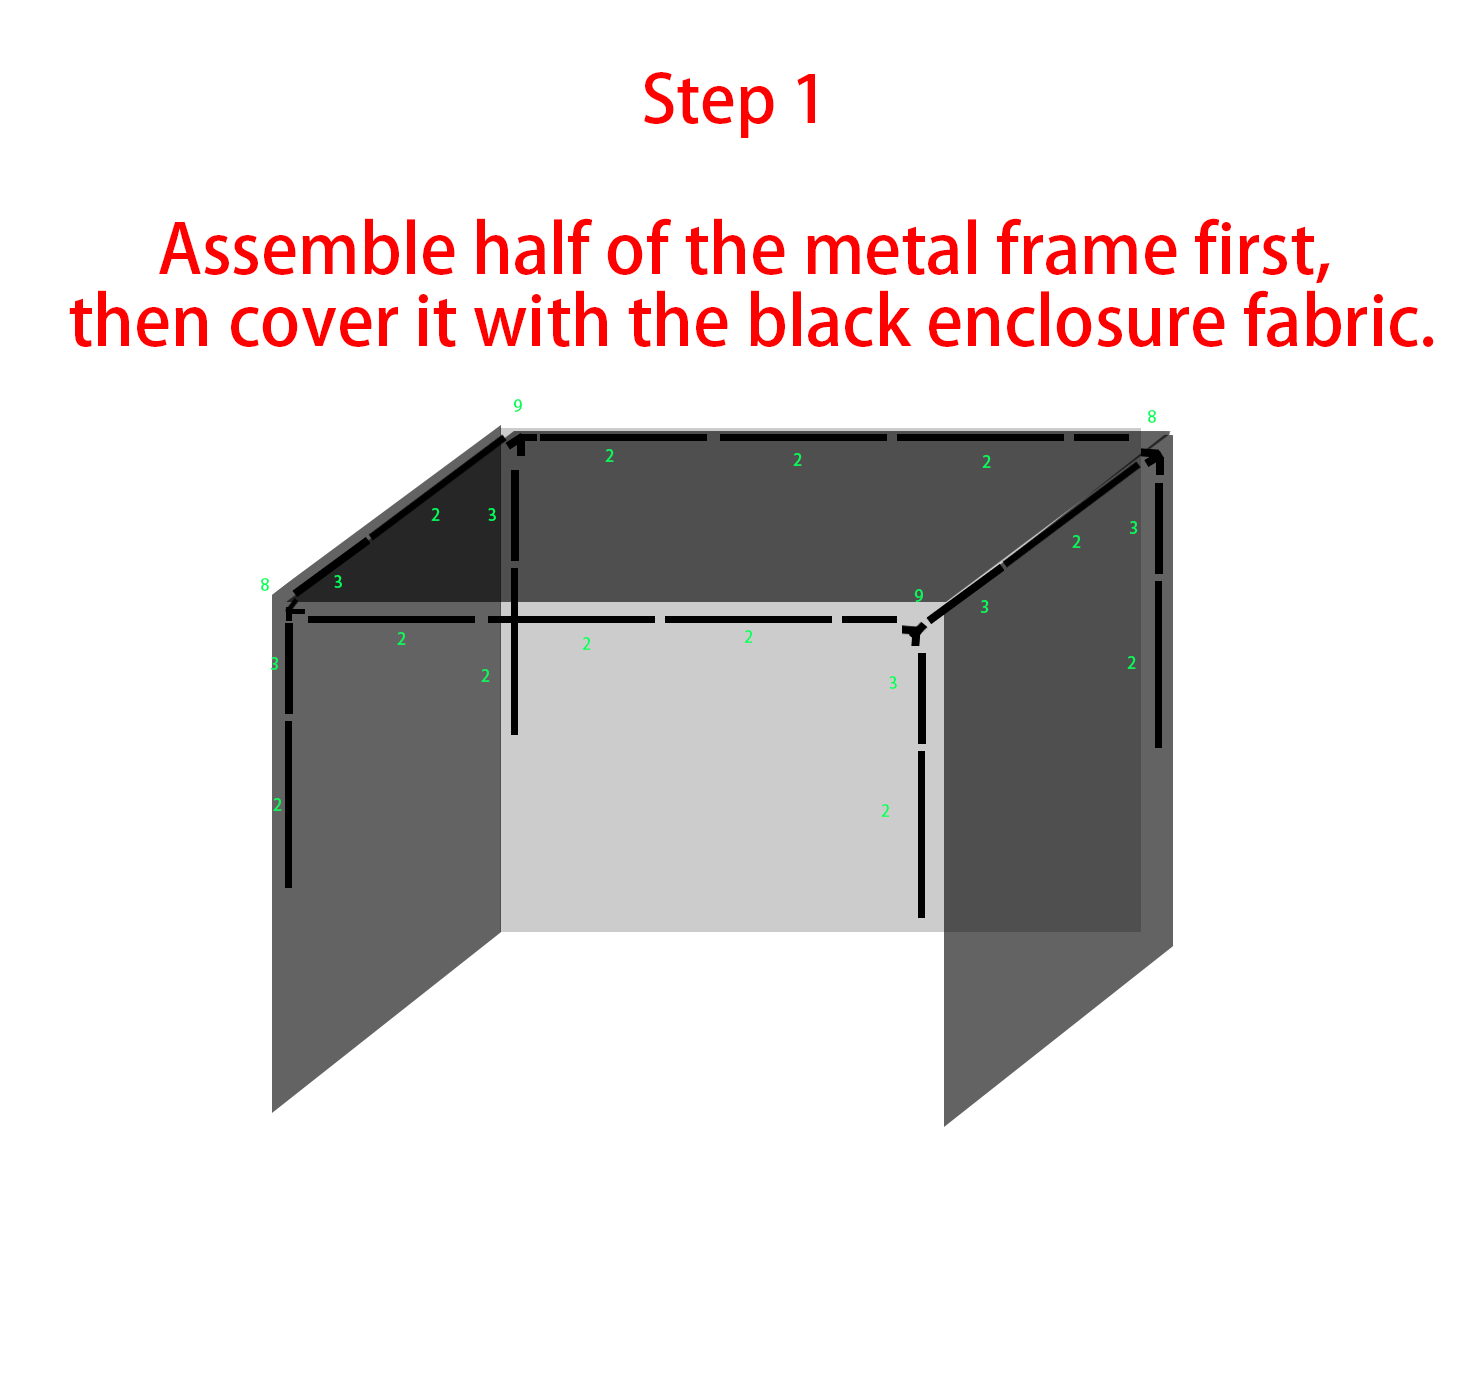
Install The Enclosure Fabric While Assembling Part Of The Frame
The enclosure fabric helps protect the side and rear areas of the hitting bay. It also creates a darker and cleaner background, which is helpful for indoor golf simulator projection and practice.
Step 2: Connect The Remaining Frame
After the first part of the frame and enclosure fabric are installed, the remaining frame parts can be connected with the previous structure. This step completes the main golf simulator frame and prepares the enclosure for screen installation.
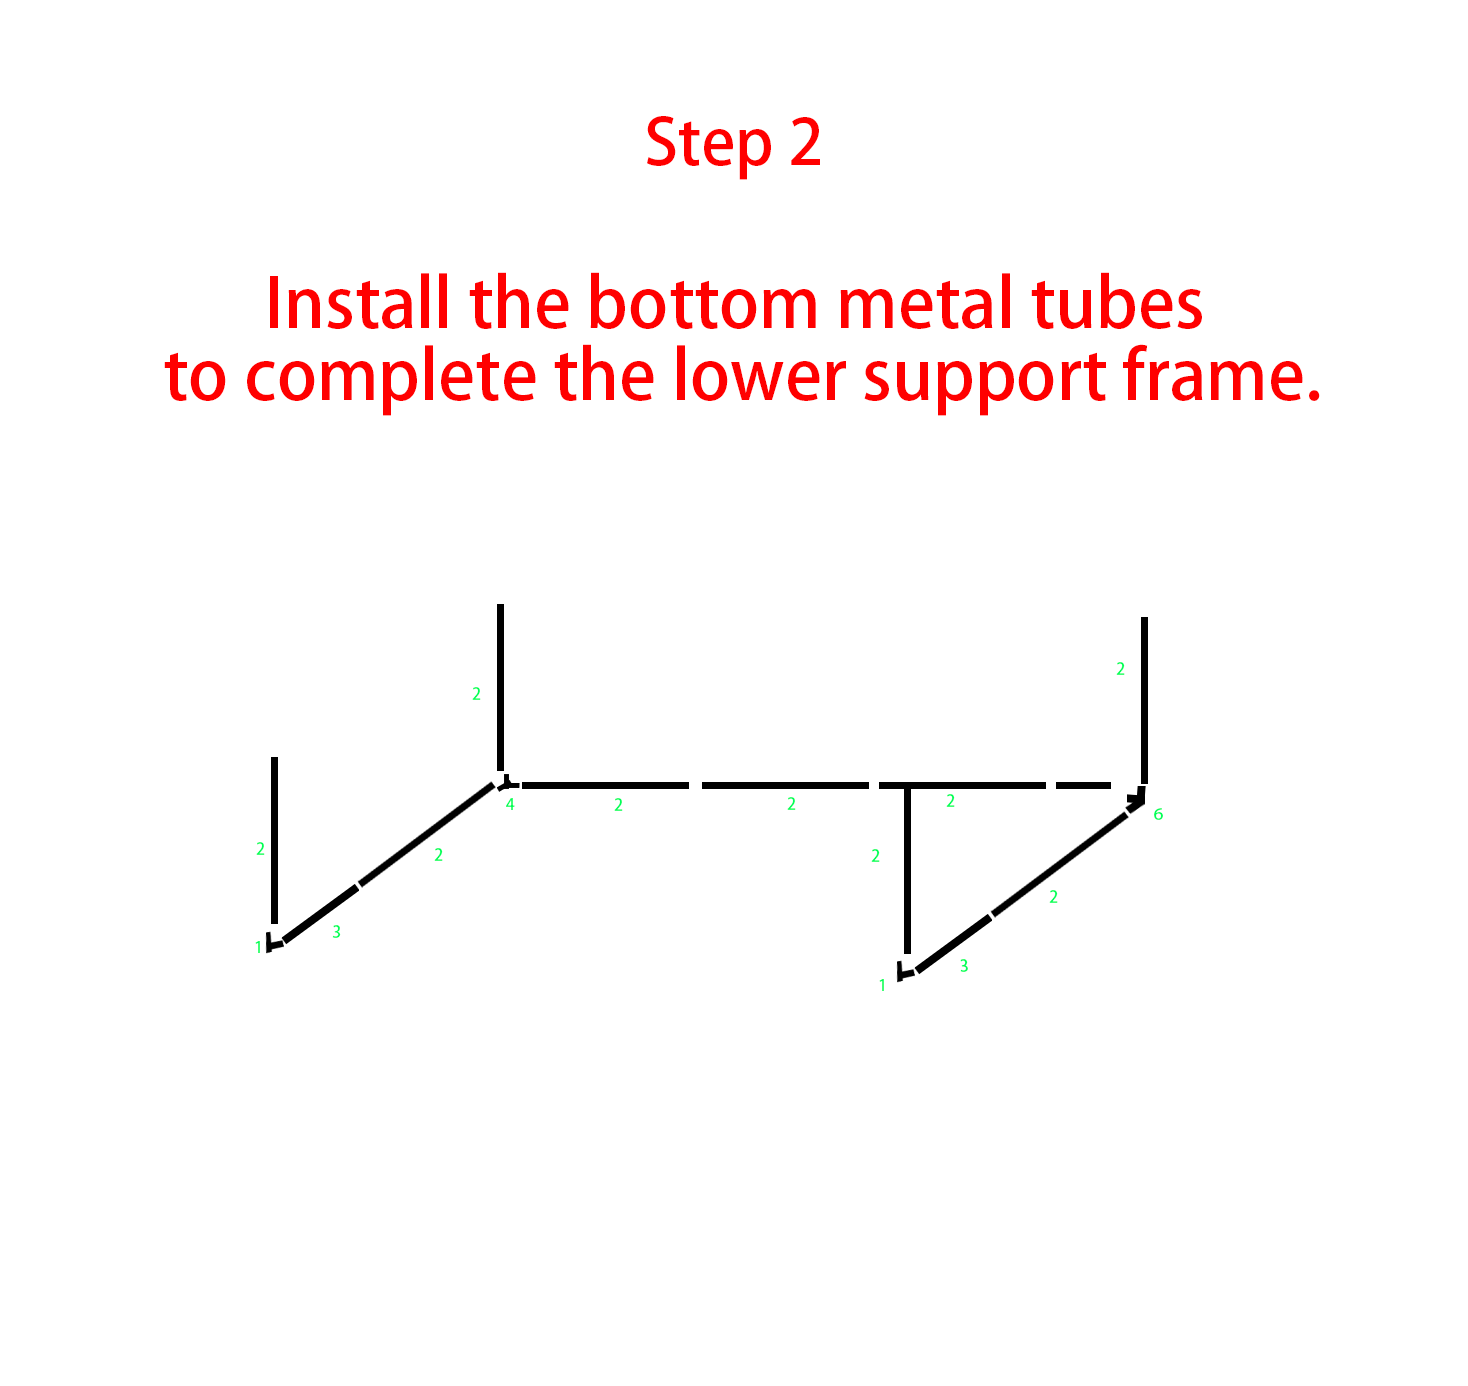
Connect The Remaining Frame With The First Frame Section
During this step, the frame pipes should be connected according to the installation drawing. A properly assembled golf simulator frame can provide better support for the impact screen, rear fabric, side fabric, and cover strips.
Golf Simulator Enclosure Fabric
The golf simulator enclosure fabric is an important part of the complete golf hitting bay. It covers the side and rear areas, helps block stray balls, improves the overall appearance, and creates a more professional indoor golf practice environment.
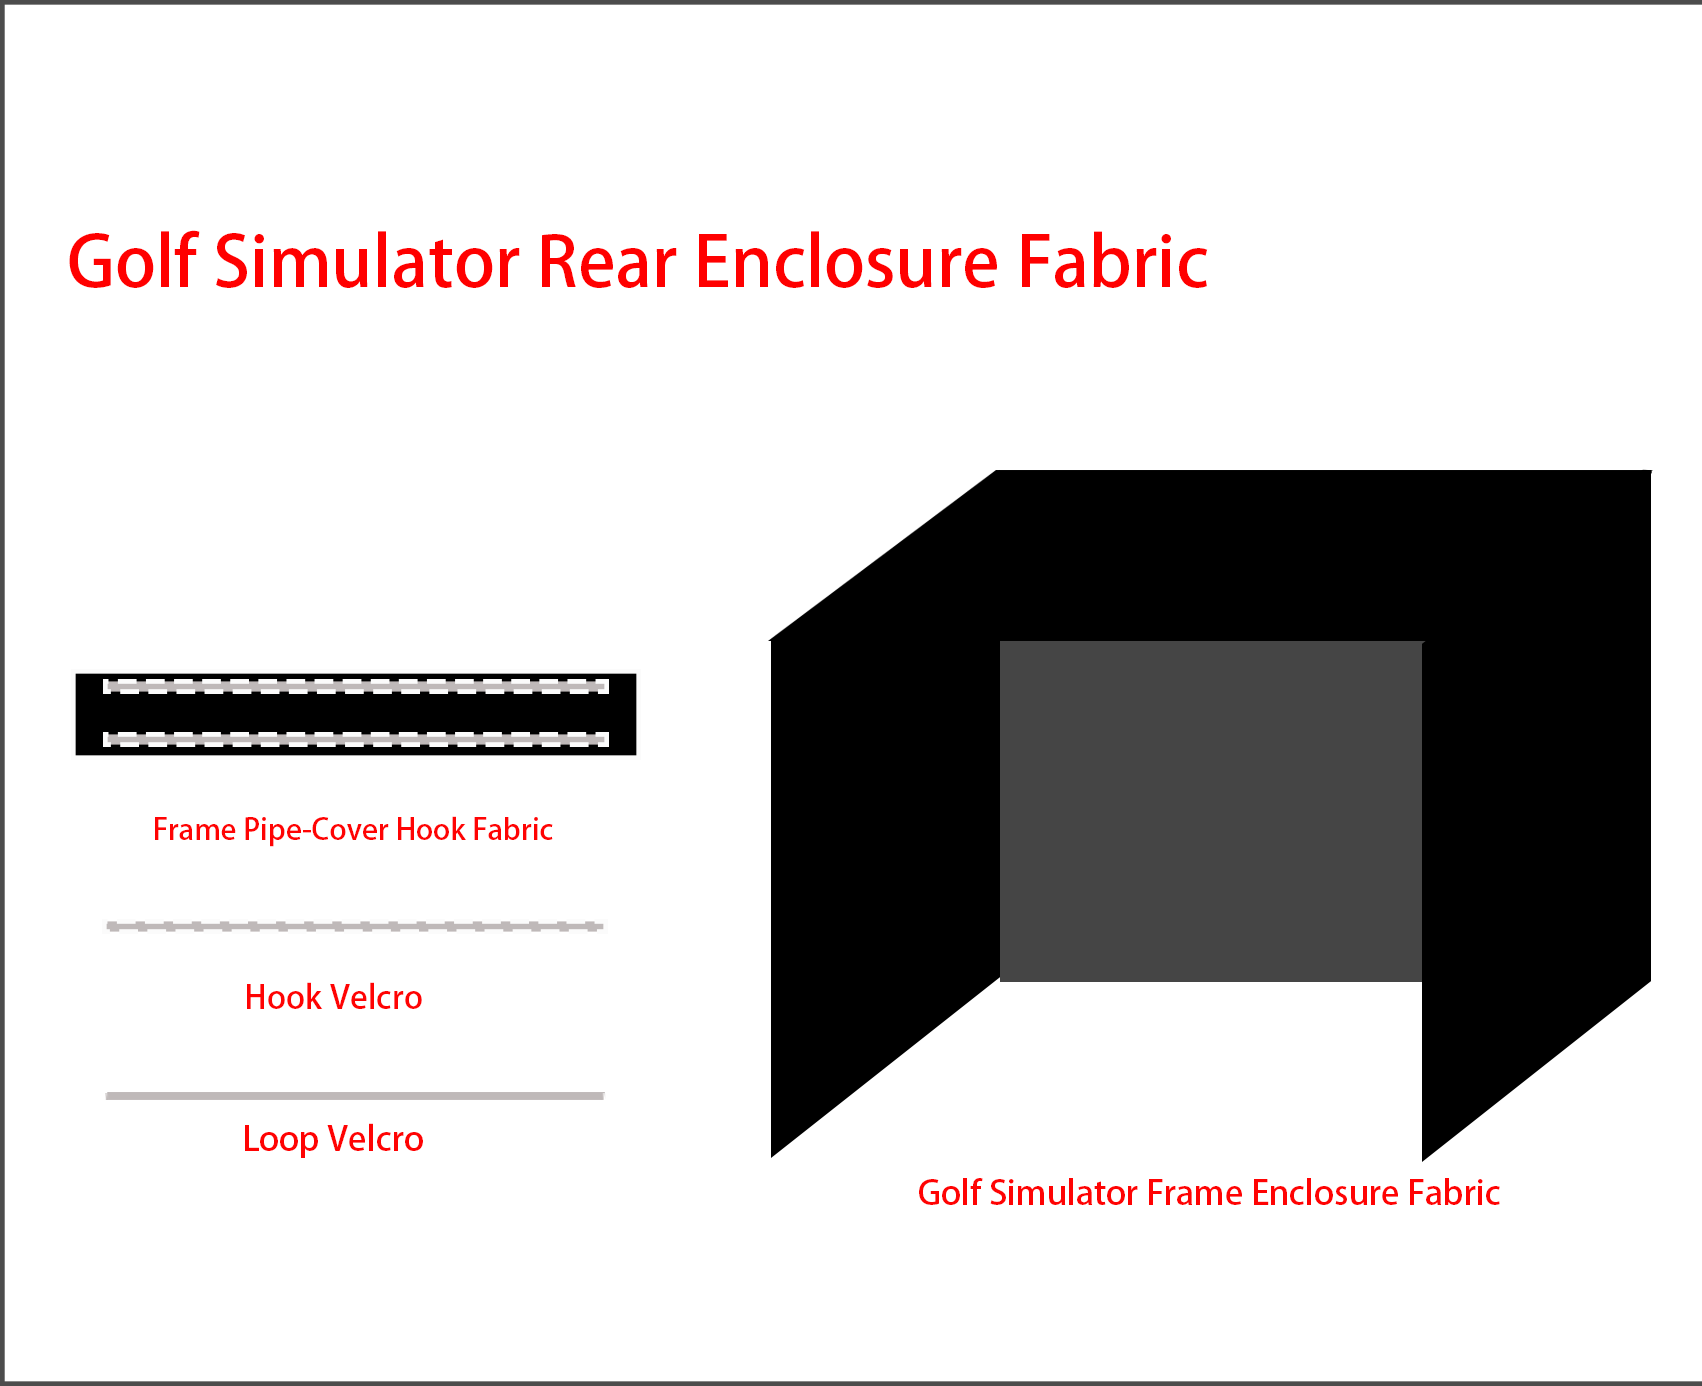
Golf Simulator Rear Enclosure Fabric And Side Fabric
The enclosure fabric is usually installed with hook and loop Velcro or related fixing parts. It works together with the frame pipe cover strips to make the whole golf simulator enclosure look neat and complete.
Golf simulator enclosure, golf simulator frame, golf enclosure fabric, golf simulator cage, golf hitting bay, indoor golf simulator enclosure, golf practice enclosure, golf impact screen, golf simulator screen kit, and golf training equipment.
Golf Simulator Enclosure Exploded View
The exploded view shows the main structure and parts of the golf simulator enclosure. It helps customers understand how the frame, rear enclosure fabric, side fabric, Velcro, impact screen, sound-dampening screen, bungee cords, and cover strips work together.
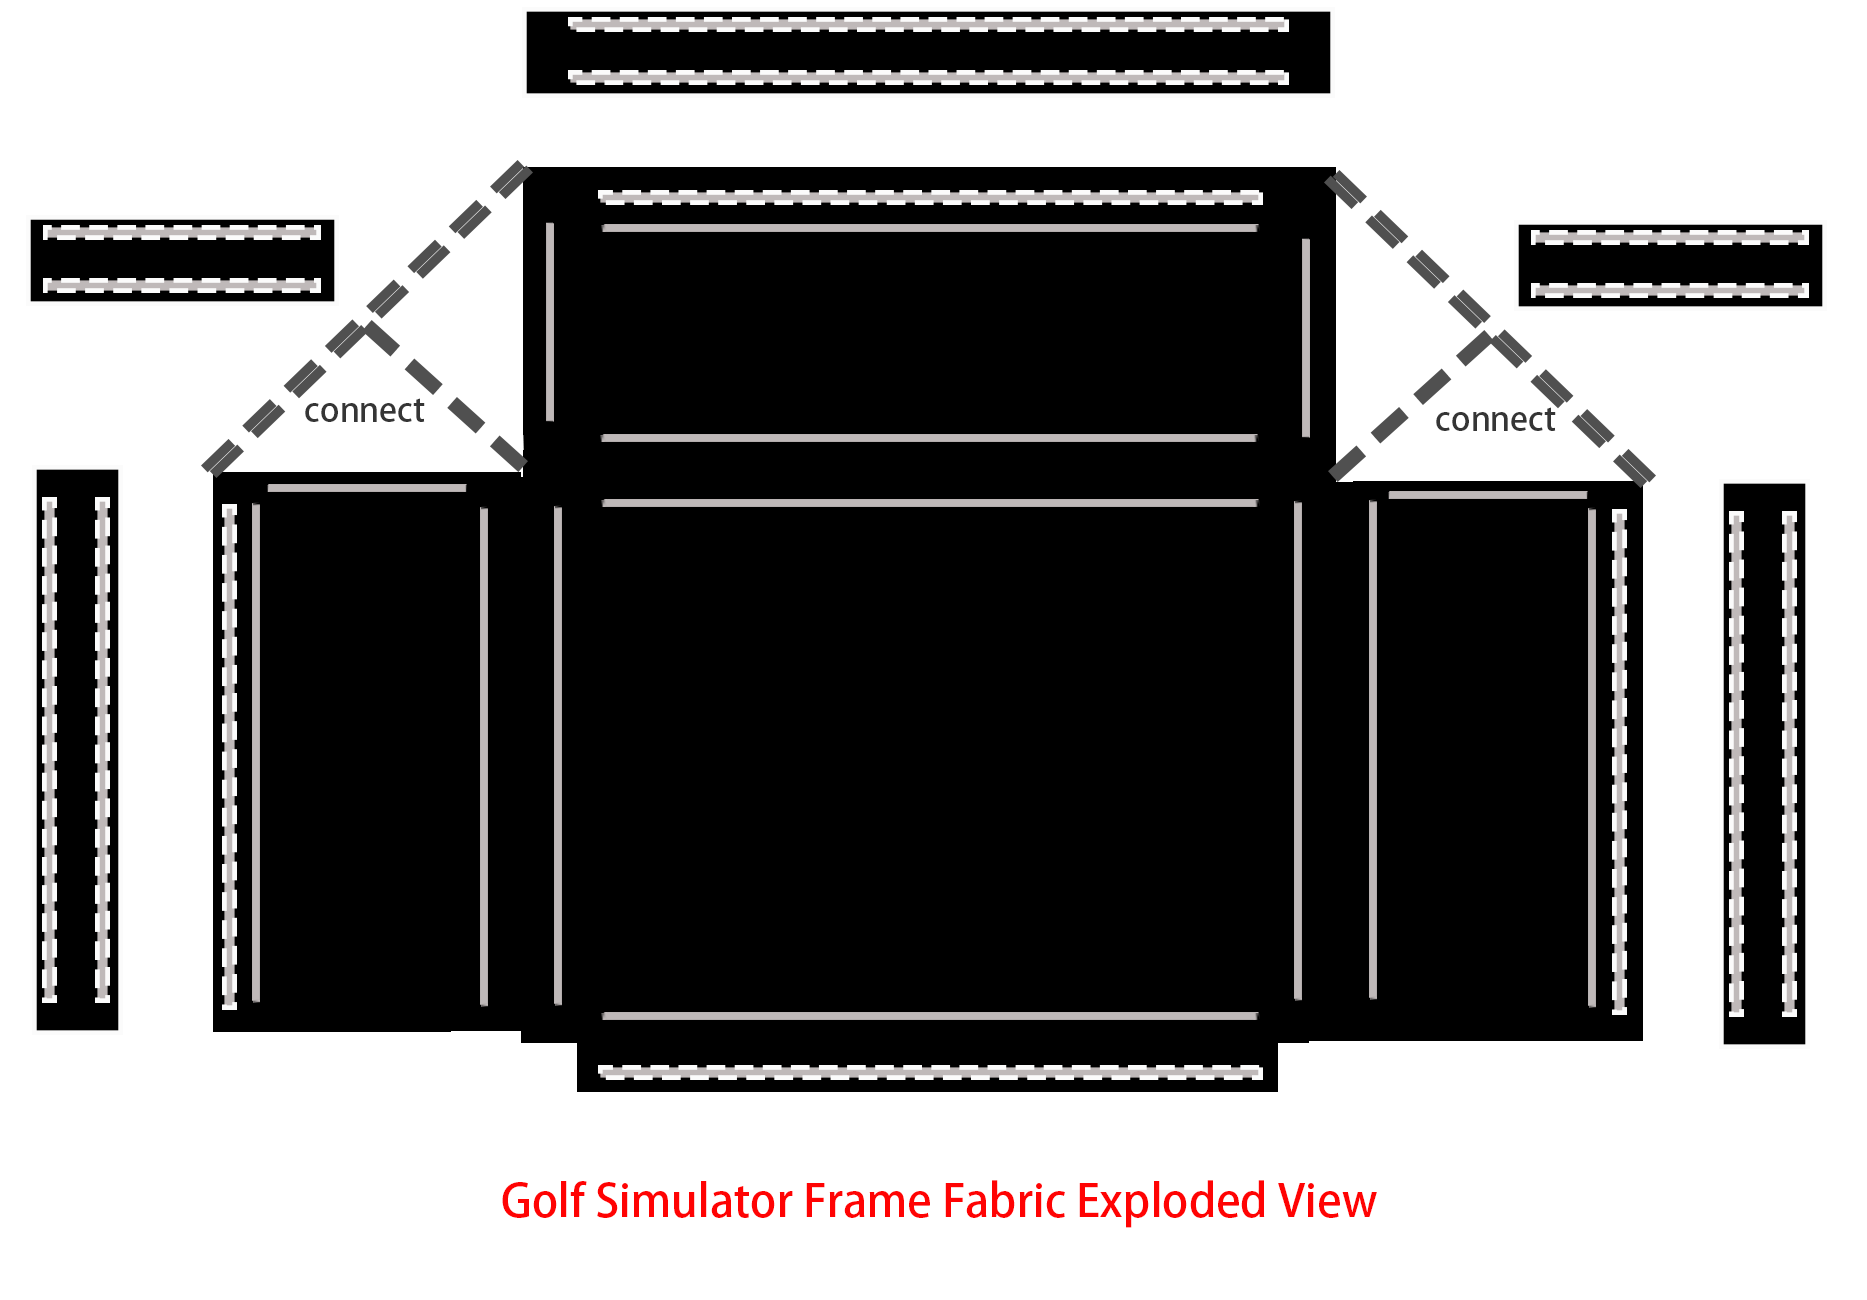
Golf Simulator Enclosure Exploded View
This clear structure is useful for distributors, installers, golf equipment brands, and end users. It makes the golf simulator enclosure easier to understand, easier to install, and easier to explain to customers.
Step 3: Prepare The Impact Screen And Rear Sound-Dampening Screen
The impact screen is one of the most important parts of the golf simulator enclosure. It receives golf ball impact and also works as the projection screen for golf simulator software. The rear sound-dampening screen helps reduce impact noise and improve the hitting experience.
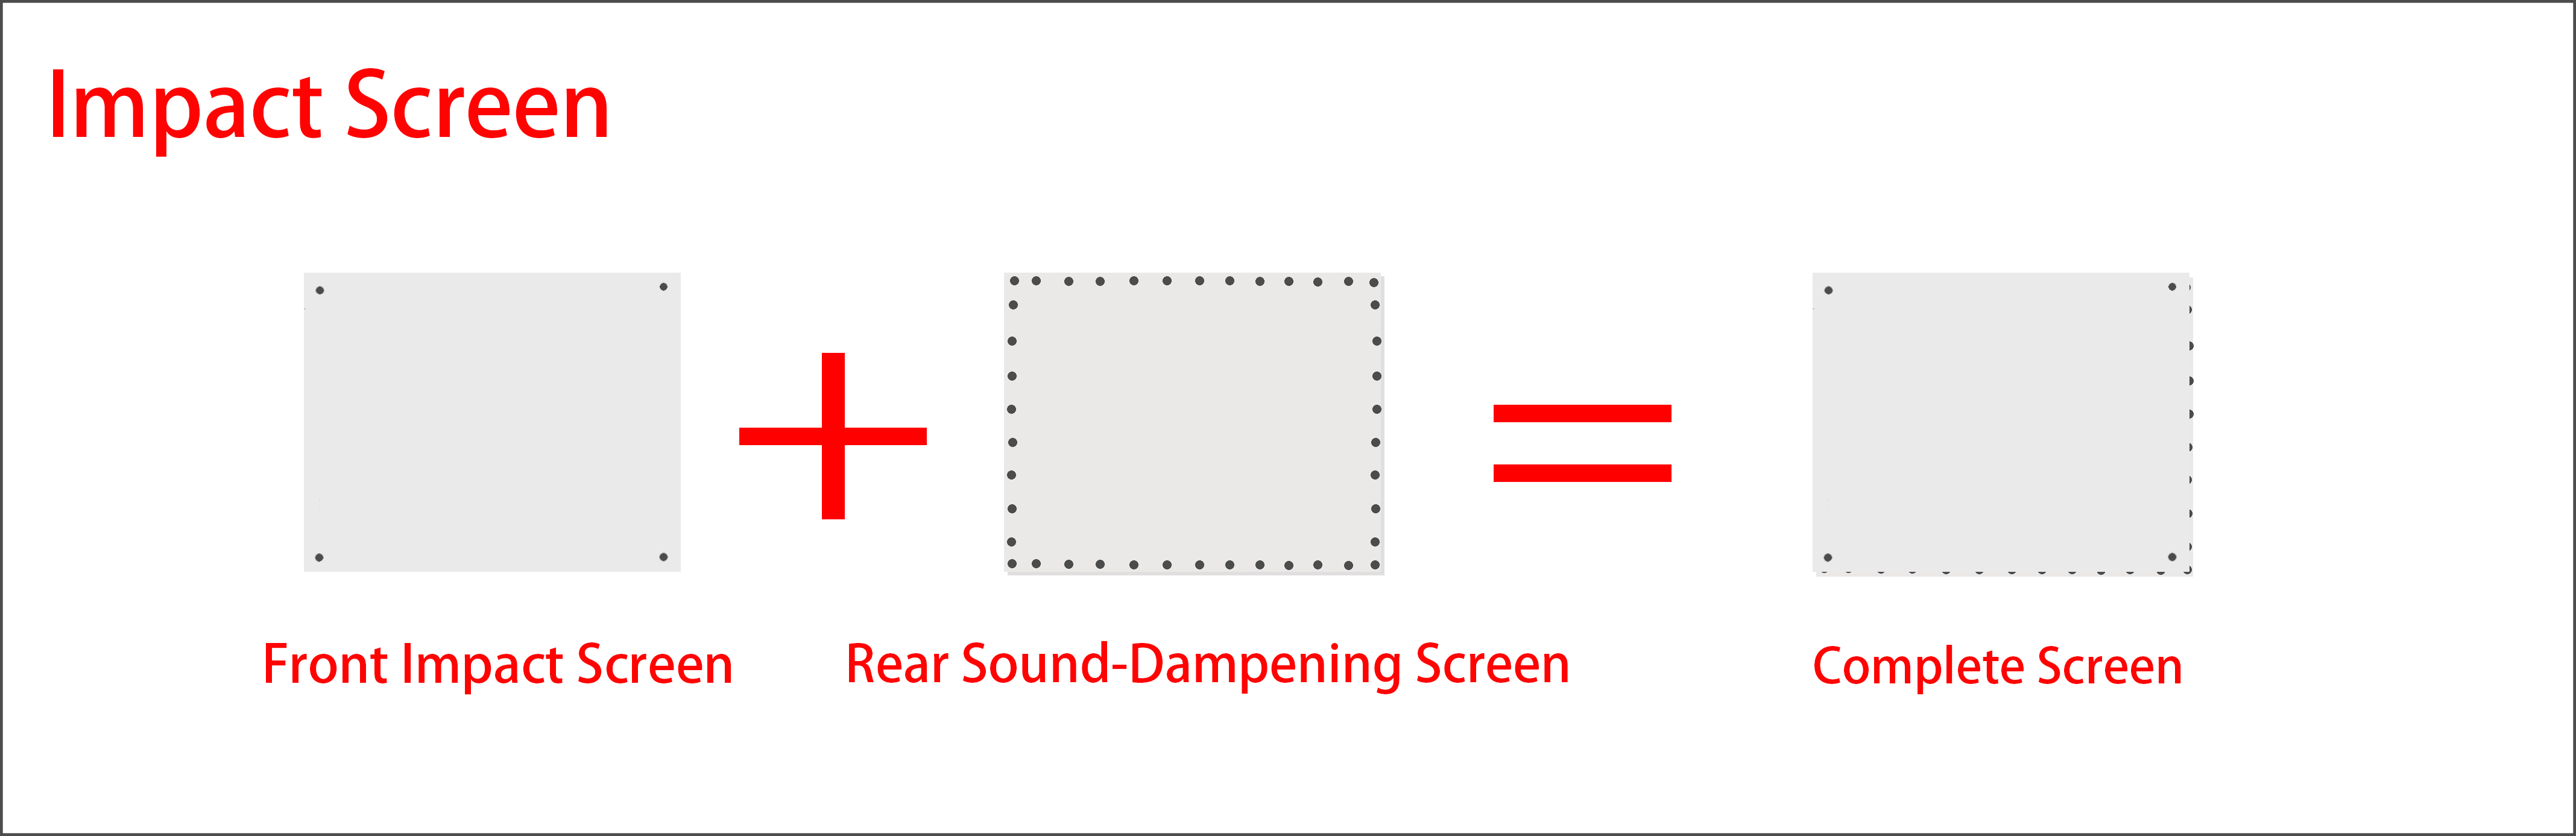
Front Impact Screen And Rear Sound-Dampening Screen
Before hanging the screen, the front impact screen and rear sound-dampening screen should be aligned and connected properly. The holes around the screen allow the complete screen to be fixed to the frame with elastic bungee cords.
Step 4: Hang The Screen With Bungee Cords
After the screen is prepared, it can be hung onto the golf simulator frame with bungee cords. The elastic bungee cord hanging method is simple and practical. It helps keep the screen in place while allowing a certain level of flexibility during ball impact.
The screen tension should be balanced on all sides. The golf impact screen should not be too loose or too tight. Proper tension can help keep the screen surface flatter and improve both projection quality and hitting performance.
Step 5: Attach The Cover Strips And Finish The Complete Golf Simulator Enclosure
The final step is to attach the frame pipe cover strips. These cover strips help hide the frame pipes and edge areas, making the complete golf simulator enclosure look cleaner, safer, and more professional.
Complete Golf Simulator Enclosure
After the cover strips are installed, the whole golf simulator bay is complete. The black enclosure fabric, white impact screen, stable frame, and neat edge finishing create a professional indoor golf training space.
Golf Simulator Enclosure Assembly Steps
- Check the complete golf simulator frame preview before installation.
- Assemble part of the frame first and install the enclosure fabric.
- Connect the remaining frame with the previous frame section.
- Install the rear enclosure fabric and side enclosure fabric properly.
- Prepare the front impact screen and rear sound-dampening screen.
- Hang the complete screen onto the frame with bungee cords.
- Attach the frame pipe cover strips to finish the golf simulator enclosure.
Suitable For Indoor Golf Simulator Rooms
This golf simulator enclosure is suitable for home golf simulator rooms, garage golf practice areas, indoor golf training centers, golf teaching studios, commercial simulator bays, sports clubs, golf academies, and entertainment golf spaces.
It can be used together with golf hitting mats, golf practice mats, artificial turf golf mats, golf nets, launch monitors, projectors, golf simulator software, and other golf training equipment. For customers who want to build a complete indoor golf practice area, this enclosure provides a practical and professional solution.
A Practical Golf Simulator Enclosure Kit
Compared with complicated installation systems, this golf simulator enclosure is designed for easier assembly. The clear frame structure, enclosure fabric, impact screen, bungee cords, and cover strips make the installation process more convenient for customers.
For distributors, importers, golf equipment brands, sports product wholesalers, and indoor golf project customers, a simple assembly golf simulator enclosure can help reduce installation difficulty and improve customer experience.
We can support golf simulator enclosure orders, golf impact screen orders, indoor golf hitting bay projects, golf practice mat combinations, and related golf training equipment supply for different markets.
If you are looking for a golf simulator enclosure supplier, golf impact screen manufacturer, indoor golf simulator cage factory, or complete golf hitting bay solution, we are ready to support your wholesale orders, OEM customization, and long-term cooperation needs.